
The cage should be finished tomorrow, there is still a little bit more mesh to go on. I am posting a detailed build on our website (link below) for those interested in more detail. It will need to be in three parts as its quite long. The first post of three is about the design stage and the building of the frame and connection of the launcher, its live now.
http://wrocket.hampson.net.au/?p=1319
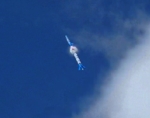
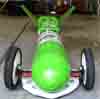
I want to make sure there are some pics and content on the forum as well and not all on our website. So Ive attached some pics below. These are all from part 1 which is the build of the frame. We used 35mm x 18mm pine for the frame itself. I estimate approx 16m of it all up. The cage is 155cm long, 45cm high and 71cm wide. The cage is designed to fit over the launcher and recoil with the launcher when the car launches. Yes it still recoils, even with 20kg of water ballast on the launcher.
Due to our wing arrangement, we have to install a guiderail. It seemed pretty obvious that the wings would probably hit the side of the cage before the rear of the car emerged from the cage. We also needed to install a hinged access panel to gain access to connect the nozzle to the launcher, it was too far to reach in from the front of the cage and try to connect them.
Here are a couple of pictures from part 1.
- Frame Assembly
- water-rocket-car-cage 005.jpg (613.83 KiB) Viewed 77 times
- Test Fit of launcher
- water-rocket-car-cage 010.jpg (685.21 KiB) Viewed 77 times
- Launcher connected
- water-rocket-car-cage 016.jpg (346.15 KiB) Viewed 77 times
- Car on launcher in cage frame
- water-rocket-car-cage 019.jpg (330.43 KiB) Viewed 77 times
I will document the second section and add some pics in the next few days - Launch Rail attachment, the lugs on water rocket car, painting.
The third section is adding the mesh itself which was an ordeal all of its own . I have the scrathes to prove it .. LOL
-todd-