tcarnahan wrote:I recently bought a Mini DV D005 camera from Deal Extreme
http://www.dealextreme.com/p/mini-2-0-m ... slot-34157.
For the price, it is a fairly decent digital camcorder. The only complaint I would have is that it came by (literally) a "slow boat from China" and its instructions are hard to follow ... but I digress.
My question is how to mount it on my payload?
It measures : 2.48 in x 1.22 in x 0.87 in (6.3 cm x 3.1 cm x 2.2 cm) and weighs: 6.17 oz (175 g). Its lens is 90 degrees to the camera body. It has a voice actuated mode so one could turn it on, set the mode, then slide it into the payload and launch. It takes a microSD card (I am using a 4gb card).
My concerns:
- How to get the head outside the payload without drag problems
- How to quickly secure it so that it doesn't come loose during acceleration
If anyone can suggest a way to meet these requirements or can show me a link to someone who already has this one solved, I would appreciate it. Note: most of the sites I have seen, the photos are so far away or at an angle that you cannot tell how they mounted the camera.
Thanks ahead of time for your help!
-- Tom
The attachment Camera_001.jpg is no longer available
The attachment Camera_002.jpg is no longer available
The attachment Camera_003.jpg is no longer available
Hi Tom,
We're not familiar with that exact model camera. It resembles the MiniDV MD-80 camera that is widely used.
Does your camera suffer from the same problem with the (timesatamp that cannot be turned of)f as the MD-80 clone cameras have? We had an extensive discussion about those cameras in this topic:
http://www.wra2.org/forum/viewtopic.php?f=5&t=971 and you should check it out to see if you have a new variant of that design. It would be nice to know if that camera has the same innards as the others because we have a tutorial series on our YouTube Channel (
http://www.youtube.com/uswaterrockets) describing our method for removing the date overlay from the videos.
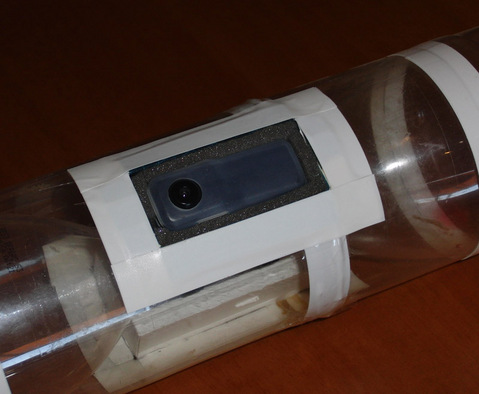
To answer your questions, the absolute best way to mount the camera would be to place it inside the rocket and not on the outside. The way you do this is pretty much up to you, but a nice way to do this is to cut a "window" in the side of your nosecone and epoxy a small piece of glass (you can get microscope specimen slides for this) over the inside of the hole to seal it off.
The camera doesn't have any good way to mount it so your next job is to epoxy some "mounting ears" to the sides of the camera. Some small wooden blocks or plastic scraps can be glued to the sides of the camera. You then drill holes through the ears so you can attach it to the inside of the nosecone looking out the "window". Some people use "hook and loop" / "velcro" to hold the camera on the inside of the nosecone wall but our rockets use ultra high pressures and we don't want to risk the camera coming loose on launch.
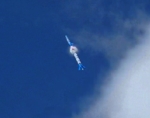
One thing you can do if you are using a barometric altimeter on your rocket is to place the camera behind the "breather" hole for the altimeter and use the breather hole for the camera to look out of. This eliminates the need to construct a window and uses an existing hole for multiple purposes, which is more efficient. We have sample videos on YouTube showing what this looks like from inside the rocket.

- Pinhole Camera viewing out through altimeter air hole.
- pinhole.jpg (110.23 KiB) Viewed 20 times
If you want to look "down" at the ground during the flight, you either have to attach the camera to the outside of the rocket looking down, or you need to glue a small mirror at a 45 degree angle in front of the "window". Take apart a cheap dental mirror you can buy at the drugstore for the mirror glass.
If you have any questions, feel free to ask!
Please post your videos after you launch. We'd love to see them!


